Next up on the things to investigate is the 4 keyboards

Judging by the connectors, it was obvious that these aren’t modern (PS2, USB or even 5 pin DIN) keyboards. Likely either a raw matrix or maybe parallel ASCII. Lets open them up and have a poke around!
First off the block was this dusty looking thing.

Initially I didn’t take much notice of the sticker on the bottom, so when I opened it up, I was surprised to see it was a Cherry keyboard. Of course this was before the days before colour, so the Cherry Green or Cherry Red key switches weren’t an option – These were just generic black.
The use of an EPROM in a keyboard came as a bit of a surprise to me too. However, it makes sense. There is a Philips MAB8035HL microprocessor onboard, which does all the row and column scanning, then, presumably , looks up the character that this key corresponds to on the EPROM, and puts the ASCII value of that character on the parallel connector. Using an EPROM for this would allow for different locales.
This particular one had the original connector cable replaced with a 20 pin ribbon cable socket. This may be of some relevance later in this Retro Challenge!
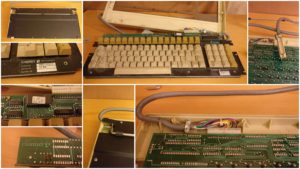
Next up was another one virtually the same. The only difference of note though is the original cable, terminated with a 25 pin D plug, was still in place.

The third keyboard was a bit more solid construction, and was branded as Alphameric. It had a similar design with an 8035 microprocessor and a 2k EPROM. Interestingly, they had stuck an identifying sticker on the EPROM, but not over the window! I’ve no idea how UV-proof the keyboard case is, or if it’s been stored in a dark location for most of it’s life, but I’d assume that at least some of the bits would have leaked out over time and got carried away on a sunbeam.
The external connector was a 25 pin D, although internally it was fed from a 16 way ribbon cable.
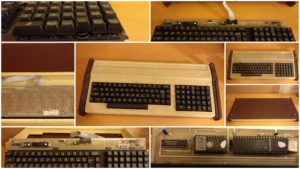
Of the 4 keyboards, this last one was my favourite. Really, who doesn’t like a keyboard with a hexadecimal number pad! Maybe the designers were very forward-looking and anticipated the rise of IPv6! ;-)
This was obviously from the same range as the previous Alphameric keyboard as everything about the PCB and layout was the same, with the obvious additional keys on the number pad. Curiously, not only did this have all the numbers from 0-F, but 10 function keys and also 5 unmarked keys. One of these keys had an extra heavy duty spring under it, so possibly this is a reset button or something else important that you don’t want to push by accident. Again, the EPROM window had been missed by the sticker!
The case itself is a combination of moulded plastic and some kind of compressed moulded heavy fibreboard type stuff for the base/sides.
Connection was via the same kind of ribbon cable to 25 pin D plug. I traced a few of the connections through and have identified the power & ground pins and 9 data pins (8 data and 1 strobe? or 7 data and 2 control lines?).
Next step is to feed them some power and see what data comes out. I’m hopeful that the EPROMs with non-covered windows are still intact, but will start with one of the Cherry ones, just to get an idea of what to expect. It will also be worth pulling the EPROMs and sticking them in a reader – partly to archive them, partly to see the code they run, and partly to play around with the character map. That might not happen during this Retro Challenge time frame though.
Alphameric was disolved in 2007, however, the keyboard side of the business was sold off in 2004 to Devlin, who make commercial input devices.